
After learning the basics of HTML, it’s time to code our first HTML file in few easy and simple steps with beginner’s guide. This post includes coding, running, and saving your first HTML document.
Chapter 1: Lets code <html>.
HTML with sample code:
What is HTML?
HTML stands for Hypertext Markup Language. In the last post, we learned that HTML is the building block of a webpage. HTML is the first step towards coding the framework of any site. With HTML, the user can create the layout, structure of the site. For example, heading, paragraph, list, tables, etc.
Below is an HTML sample code:
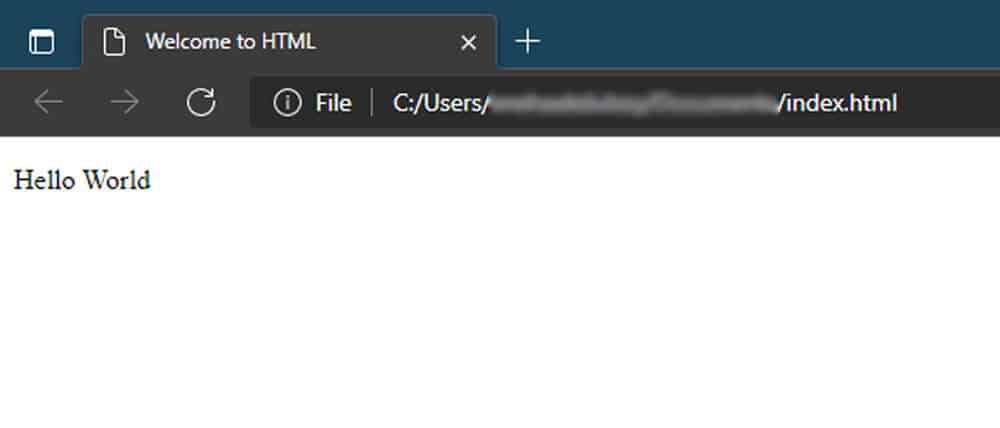
<!DOCTYPE html>
<html>
<head>
<title> Welcome to HTML </title>
</head>
<body>
<p> Hello World </p>
</body>
</html>
The output of the above code:
Requirements for HTML.
An HTML file requires two things: Editor to code and browser to check the code.
Editor:
An editor is software where you will code your webpage. There are many text editors like sublime text, notepad++, visual studio, abode Dreamweaver, etc. You can use any editor, but as a beginner, let’s keep it simple.
We will use simple text edits like notepad (Windows) or TextEdit (Mac).
Browser:
The browser will interpret your code and display the output of your HTML file. Browsers include Microsoft Edge, Google Chrome, Mozilla Firefox, Opera, etc.
Additionally, you can also check your shortcode on CheckCode.
[maxbutton id=”2″ ]
Also read: How to use CheckCode?
Let’s create your 1st HTML code:
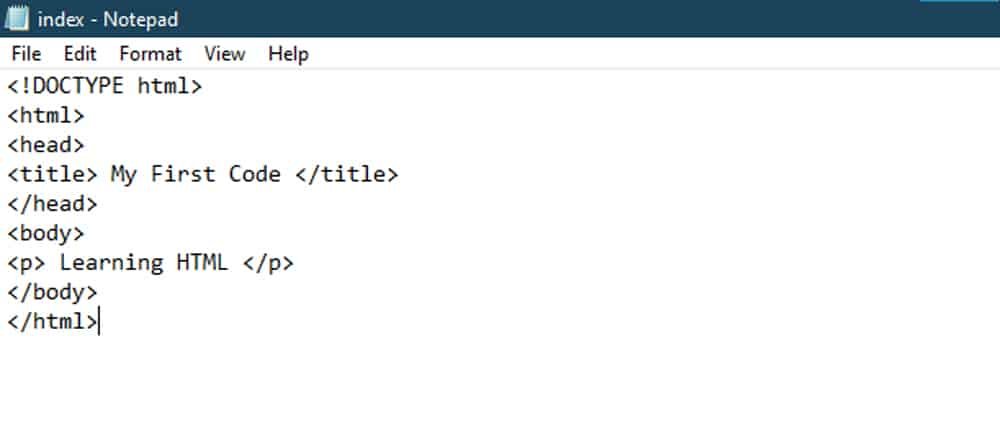
Open Notepad or TextEdit on your computer and type or copy the code in your editor:
Code
<!DOCTYPE html>
<html>
<head>
<title> My First Code </title>
</head>
<body>
<p> Learning HTML </p>
</body>
</html>
Code on notepad screenshot:
Save your code
After typing the code, the next step is to save the code as an HTML file. Click on save as and write index.html
Note: Here, the index is the name of the file.
.html is the extension so that the browser knows that this is an HTML file.

The output of your code
Now you have coded and saved your first HTML, now is the time to view your work. Just double click on your index.html file, then the page will open in your default browser.

Naming an HTML file
The following points should be noted while naming an HTML document:
- You need to give the webpage a name and add a suffix (an extension) to its name.
- The homepage is the main page of your site that contains all info about your business.
- index.html is the default name for any homepage.
- It is a message to the browser that the file is the main page of the website.
- When we later create more pages like about or contact, we will save those pages as about.html, contact.html respectively.
- Avoid using spaces in your filename as the browser replaces spaces with %20 or strange symbols.
- In HTML, suffix is either .htm or .html to tell the browser that this is an HTML file. Except a missing ‘l’, there is no difference between .html or .htm.
It’s up to you, but I prefer using .html.
Explaining the code:
Understanding the basics of code
HTML Tags:
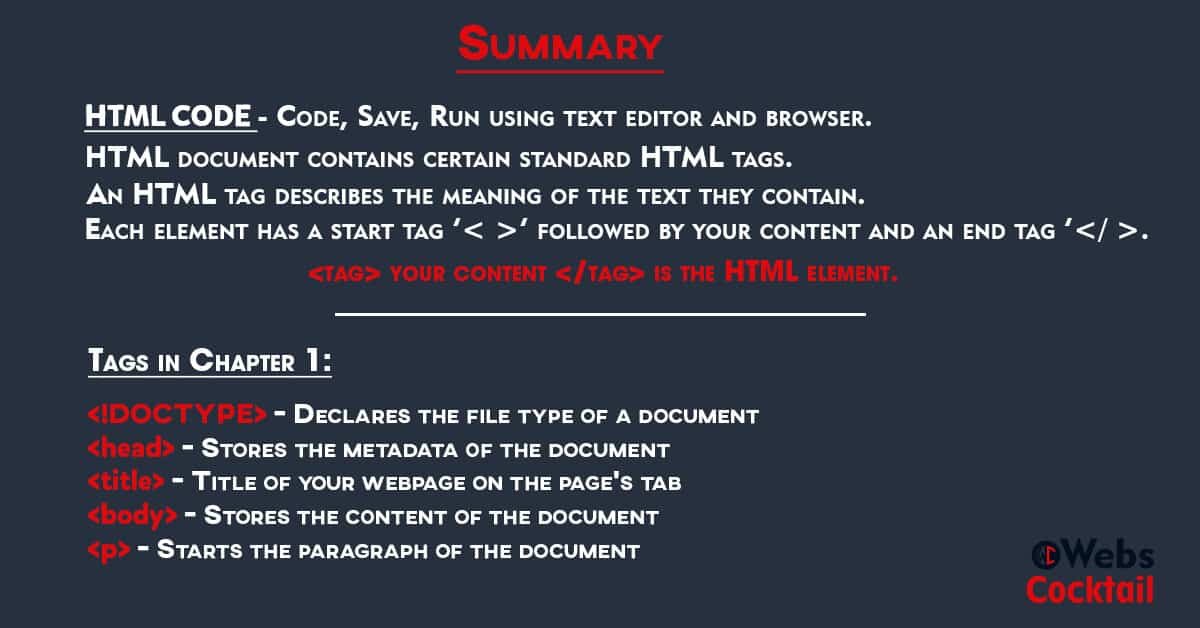
Every HTML document contains certain standard HTML tags. An HTML tag describes the meaning of the text they contain. The browser doesn’t display these tags, but we need to tell the browser that something is a tag.
Start and End Tags:
Each element has a start tag followed by your content and an end tag.
As a result, to define a start tag, type ‘less than’ and ‘greater than’ symbols around them i.e. <tag>
For the end tag, only type a forward slash after the ‘less than’ symbol. </tag>
<tag> your content </tag> is the HTML element.
Some elements include attributes or additional info inside the start tag, which we will discuss later.
HTML is not case-sensitive. However, it is preferable to code in all small letters.
Decode the code
We have already coded and viewed our 1st code. Now let us break the below code one by one:
<!DOCTYPE html>
<html>
<head>
<title> My First Code </title>
</head>
<body>
<p> Learning HTML </p>
</body>
</html>
- An HTML file starts with a declaration that the file is an HTML document :
<!DOCTYPE html>
- Next is the HTML element <html>. The document should end with </html>. These opening and closing HTML tags store the complete element of your webpage. All your HTML tags and content is written between them.
<html> all content </html>
- The <head> element – stores metadata about the HTML document.
- The <title> element – is one of the tags between the <head> element. It shows the Title of your Webpage on the page’s tab.
- The browser view doesn’t display the content of the <head> element. Statements that gives info the search engines are placed between the <head> and </head> tags. The browser displays the <head> element in its title bar.
<head> information for search engine </head>
- The <body> element – contains the contents of the document. The <body> element defines the complete data to be displayed. The content of each webpage includes the headings, paragraphs, lists, links, etc.
<body> content of the webpage </body>
- The <body> tags have headings, paragraphs, tables, lists, images, links, etc. For example, the <p> defines a paragraph element in a document.
<p> paragraph </p>
- Remember, everything that is visible on your HTML document is between the <body> element.
- In short, this is a step-by-step towards coding your first code.
Steps to coding a simple HTML file
- define document using <!DOCTYPE html>
- start your HTML coding with <html>
- Code the top part of website i.e. <head>
- declare the name of your webpage: <title> content </title>
- close th head </head>
- code the content of your webpage using <body>
- write your heading using <h1>tags
- orwrite the paragraph of the document <p> my paragraph </p>
- tell the browser that page has ended </body>
- close the HTML file i.e. end f the fie with </html>
Tags of Chapter 1:
<!doctype> Declares the file type of a document.
<head> Stores the metadata of the document.
<title> Title of your webpage on the page’s tab.
<body> Stores the content of the document.
<p> Starts the paragraph of the document.
Firstly, create a folder for HTML, open a notepad, and code your 1st code using the above steps. Save your run and check the output of your code on the browser.
To check your code faster, you can use check code. Type your code in the HTML section and view your code within a second in order to save you time.
[maxbutton id=”2″ ]
You can learn to use CheckCode here.
Summary
Here is a summary for easy understanding. Moreover, you can download the image for future reference:
In short, after coding your first HTML code and running the HTML file, let’s try to format the text in your code with headings, paragraphs, break, and bold italic tags, and much more in the next post.
thankyou for shortcode